Monday, November 2, 2015

P6 EPPM R15.1 INSTALLATION AND CONFIGURATION CHECKLIST


Outline:

Table of Contents


Install and configure Single Sign-On Checklist

Pre-Installation Checklist:

Done
(Y/N)
Sequence
Topic
Documents

1
JDK installation


2
Setting an Environment Variable for Java


3
Installation a Database


4
Installation RCU


5
Installation OS packages


6
Adding hostname in /etc/hosts


7
Installation Weblogic Server

Oracle Unified Directory (OUD) Installation and Configuration Checklist

Done
(Y/N)
Sequence
Topic
Documents

1
Downloading the software


2
Creating Schemas using RCU


3
Welcome Screen


4
Install Software Updates Screen


5
Prerequisite Checks Screen


6
Installation Location


7
Installation Summary


8
Installation Progress


9
Installation Complete


10
OUD Configuration

Oracle Access Manager (OAM) Installation Checklist

Done
(Y/N)
Sequence
Topic
Documents

1
Download the software


2
Creating Schemas using RCU


3
Welcome Screen


4
Install Software Updates Screen


5
Specify Installation Location


6
Installation Progress


7
Installation Complete

Oracle Access Manager (OAM) Configuration Checklist

Done
(Y/N)
Sequence
Topic
Documents

1
Welcome Screen


2
Select Domain Source Screen


3
Specify Domain Name and Location Screen


4
Configure Administrator User Name and Password Screen


5
Select Optional Configuration Screen


6
Configure the Administration Server Screen


7
Configure Managed Servers Screen


8
Configure Machines Screen


9
Assign Servers to Machines Screen


10
Creating Domain Screen


11
Configuring Database Security Store Screen


OAM and OUD Integration Checklist

Done
(Y/N)
Sequence
Topic
Documents


1
Create IDS Profile

2
Create User Profile Services


3
Update OAM LDAP Authentication


4
Set OAM Console Authentication


Install and Configure Content Repository Checklist

Pre-Installation Checklist:

Done
(Y/N)
Sequence
Topic
Documents

1
JDK installation


2
Setting an Environment Variable for Java


3
Installation a Database


4
Installation RCU


5
Installation OS packages


6
Adding hostname in /etc/hosts


7
Installation Weblogic Server

Content Repository Installation Checklist

Done
(Y/N)
Sequence
Topic
Documents

1
Download the software


2
Create schemas using RCU


3
Welcome Screen


4
Install Software Updates Screen


5
Prerequisite Checks Screen


6
Specify Installation Location Screen


7
Application Server Screen


8
Installation Summary Screen


9
Installation Progress


10
Installation Complete

Content Repository Configuration Checklist

Done
(Y/N)
Sequence
Topic
Documents

1
Welcome Screen


2
Select Domain Source Screen


3
Specify Domain Name and Location Screen


4
Configure Administrator Username and password Screen


5
Configure Server Start Mode and JDK Screen


6
Configure JDBC Component Schema Screen


7
Test JDBC Component Schema Screen


8
Select Optional Configuration Screen


9
Configuration Summary


10
Creating Domain


Install and Configure BI Publisher Checklist

Pre-Installation Checklist

Done
(Y/N)
Sequence
Topic
Documents

1
JDK installation


2
Setting an Environment Variable for Java


3
Installation a Database


4
Installation RCU


5
Installation OS packages


6
Adding hostname in /etc/hosts


BI Publisher Installation and Configuration Checklist

Done
(Y/N)
Sequence
Topic
Documents

1
Download Oracle Business Intelligence Applications 11g(11.1.1.9.0)


2
Creating Schemas using RCU


3
Welcome Screen


4
Install Software Updates Screen


5
Prerequisite Checks Screen


6
Create or Scale Out BI System Screen


7
Specify Installation Location Screen


8
Configure Components Screen


9
BIPLATFORM Schema Screen


10
Configure Ports Screen


11
Specify Security Updates Screen


12
Summary Screen


13
Installation Progress Screen


14
Configuration Progress Screen


15
Complete Screen


Install and Configure P6 Primavera R15.1 Checklist

Pre-Installation Checklist

Done
(Y/N)
Sequence
Topic
Documents

1
JDK installation


2
Setting an Environment Variable for Java


3
Installation Weblogic


4
Installation a Database

Migration P6 Database Checklist

Done
(Y/N)
Sequence
Topic
Documents

1
Select Source Screen


2
Connection Information


3
Select Target


4
Connection Information


5
Configure Oracle Tablespaces


6
Migrate Database


7
Create Oracle Users


8
Migrate Options


9
Migrate Database…


P6 EPPM Installation and Configuration Checklist

Done
(Y/N)
Sequence
Topic
Documents

1
Download the wsdl4j-1.6.2.jar


2
Grant
Privileges to
the SYSTEM
Use


3
Installing your P6 EPPM Suite


4
Using the database Configuration Screen


5
Using the Database Type & Connection Screen


6
Using the Create Users Screen


7
Using the P6 Configuration Settings Screen


8
Using the Application Server Configuration Screen


9
Using the Configuration WebLogic Screen


10
Using the Configuration Review Screen


11
Using the Configuration Progress Screen


12
Using the Configuration Complete Screen

P6 EPPM and BI Publisher Integration Checklist

Done
(Y/N)
Sequence
Topic
Documents

1
Creating the JDBC Connection String for BI Publisher 11g


2
Determining the Catalog Type in BI Publisher 11g


3
Adding P6 Sample Reports to Catalog


4
Adding the JDBC Data Source to the BIConsumers Role


5
Assigning Permissions to the P6Reports Folder


6
Creating Reporting Users in BI Publisher


7
Configring the Primavera P6 Administrator for BI Publisher and Publication Services

P6 EPPM and Content Repository Integration Checklist

Done
(Y/N)
Sequence
Topic
Documents

1
Establish a Trusted Connection to P6 EPPM database

2
Enable Framework folders or Folder_G


3
Create a P6 EPPM Security Group in WCCC


4
Create an P6 EPPM documents home folder on the WCCC server


5
Create users in WCCC for integrating with P6 EPPM.


6
Create a Document Type for P6 EPPM documents in WCCC


7
Create prefix in WCCC for P6 EPPM


8
Configuring the appropriate settings for the Primavera P6 Administrator


9
Restart the WCCC server


P6 EPPM and SSO Integration Checklist

P6 EPPM and SSO Prerequisite Checklist

Done
(Y/N)
Sequence
Topic
Documents

1
Installing WebLogic


2
Installing a database


3
Installing P6 EPPM


4
Installing the LDAP Directory Server


5
Installing Oracle HTTP Server

P6 EPPM and SSO Integration Checklist

Done
(Y/N)
Sequence
Topic
Documents

1
Installing and Configuring OAM


2
Installing Oracle HTTP Server WebGate for OAM


3
Configuring OAM and the Oracle HTTP Server WebGate for SSO Redirection


4
Configuring P6 EPPM for Web SSO


5
Reboot P6 Server

Content Repository and SSO Integration Checklist

Done
(Y/N)
Sequence
Topic
Documents

1


2


3


4


5


6


7


BI Publisher and SSO Integration Checklist

Done
(Y/N)
Sequence
Topic
Documents

1


2


3


4


5


6


7


Thursday, October 22, 2015

How to change MySQL datadir


Step 1: Create new data folder for mysql (For example: /u01/mysql/data)
[root@ptudvtg149 ~]# mkdir -p /u01/mysql/data

Step 2: Copy all old data of mysql to new folder ( old folder: /var/lib/mysql)
[root@ptudvtg149 mysql]# cp -r /var/lib/mysql /u01/mysql/data/
[root@ptudvtg149 mysql]#chown -R mysql:mysql /u01/myql
Step 3: Edit /etc/my.cnf
 [root@ptudvtg149 data]# vi /etc/my.cnf
[mysqld]
datadir=/u01/mysql/data
socket=/u01/mysql/data/mysql.sock         
user=mysql
# Disabling symbolic-links is recommended to prevent assorted security risks
symbolic-links=0

[mysqld_safe]
log-error=/var/log/mysqld.log
pid-file=/var/run/mysqld/mysqld.pid
[mysqld]
default-time-zone='+00:00'
[client]
socket=/u01/mysql/data/mysql.sock
port=3306

Step 4: Init new data_dir
[root@ptudvtg149 mysql]# mysql_install_db --user=mysql --datadir=/u01/mysql/data
Installing MySQL system tables...
OK
Filling help tables...
OK

To start mysqld at boot time you have to copy
support-files/mysql.server to the right place for your system

PLEASE REMEMBER TO SET A PASSWORD FOR THE MySQL root USER !
To do so, start the server, then issue the following commands:

/usr/bin/mysqladmin -u root password 'new-password'
/usr/bin/mysqladmin -u root -h ptudvtg149 password 'new-password'

Alternatively you can run:
/usr/bin/mysql_secure_installation

which will also give you the option of removing the test
databases and anonymous user created by default.  This is
strongly recommended for production servers.

See the manual for more instructions.

You can start the MySQL daemon with:
cd /usr ; /usr/bin/mysqld_safe &

You can test the MySQL daemon with mysql-test-run.pl
cd /usr/mysql-test ; perl mysql-test-run.pl

Please report any problems with the /usr/bin/mysqlbug script!
Step 5: Restart and check again mysql
[root@ptudvtg149 mysql]# service mysqld restart
Stopping mysqld:                                           [  OK  ]
Starting mysqld:                                           [  OK  ]
[root@ptudvtg149 mysql]# ps -ef | grep mysql
root      8365     1  0 14:42 pts/1    00:00:00 /bin/sh /usr/bin/mysqld_safe --datadir=/u01/mysql/data --socket=/u01/mysql/data/mysql.sock --pid-file=/var/run/mysqld/mysqld.pid --basedir=/usr --user=mysql
mysql     8470  8365  0 14:42 pts/1    00:00:00 /usr/libexec/mysqld --basedir=/usr --datadir=/u01/mysql/data --user=mysql --log-error=/var/log/mysqld.log --pid-file=/var/run/mysqld/mysqld.pid --socket=/u01/mysql/data/mysql.sock
root      8593  6957  0 14:43 pts/1    00:00:00 grep mysql


How to start network linux automatically


Step 1: Check your network

[root@PTUDServer3 ~]# ifconfig -a
eth0      Link encap:Ethernet  HWaddr 74:46:A0:98:D0:BE 
          inet addr:192.168.2.133  Bcast:10.61.118.255  Mask:255.255.255.0
          inet6 addr: fe80::7646:a0ff:fe98:d0be/64 Scope:Link
          UP BROADCAST RUNNING MULTICAST  MTU:1500  Metric:1
          RX packets:7002 errors:0 dropped:0 overruns:0 frame:0
          TX packets:1357 errors:0 dropped:0 overruns:0 carrier:0
          collisions:0 txqueuelen:1000
          RX bytes:592469 (578.5 KiB)  TX bytes:118837 (116.0 KiB)

lo        Link encap:Local Loopback 
          inet addr:127.0.0.1  Mask:255.0.0.0
          inet6 addr: ::1/128 Scope:Host
          UP LOOPBACK RUNNING  MTU:16436  Metric:1
          RX packets:2456 errors:0 dropped:0 overruns:0 frame:0
          TX packets:2456 errors:0 dropped:0 overruns:0 carrier:0
          collisions:0 txqueuelen:0
          RX bytes:278546 (272.0 KiB)  TX bytes:278546 (272.0 KiB)

virbr0    Link encap:Ethernet  HWaddr 52:54:00:D9:D3:A7 
          inet addr:192.168.122.1  Bcast:192.168.122.255  Mask:255.255.255.0
          UP BROADCAST RUNNING MULTICAST  MTU:1500  Metric:1
          RX packets:0 errors:0 dropped:0 overruns:0 frame:0
          TX packets:0 errors:0 dropped:0 overruns:0 carrier:0
          collisions:0 txqueuelen:0
          RX bytes:0 (0.0 b)  TX bytes:0 (0.0 b)

virbr0-nic Link encap:Ethernet  HWaddr 52:54:00:D9:D3:A7 
          BROADCAST MULTICAST  MTU:1500  Metric:1
          RX packets:0 errors:0 dropped:0 overruns:0 frame:0
          TX packets:0 errors:0 dropped:0 overruns:0 carrier:0
          collisions:0 txqueuelen:500
          RX bytes:0 (0.0 b)  TX bytes:0 (0.0 b)

Step 2: Set ONBOOT=yes

[root@PTUDServer3 ~]#vi /etc/sysconfig/network-scripts/ifcfg-eth0
DEVICE=eth0
TYPE=Ethernet
UUID=c47a963d-3fb0-44f5-b3c7-4ff8d619a043
ONBOOT=yes
NM_CONTROLLED=yes
BOOTPROTO=none
DEFROUTE=yes
IPV4_FAILURE_FATAL=yes
IPV6INIT=no
NAME="System eth0"
IPADDR=192.168.2.133
PREFIX=24
GATEWAY=192.168.1.1
DNS1=10.79.255.10
HWADDR=74:46:A0:98:D0:BE
DOMAIN=10.79.255.12
LAST_CONNECT=1443171251

Step 3: Start network with OS.

[root@PTUDServer3 ~]# chkconfig network on

Step 4: Test Network

[root@PTUDServer3 ~]# service network restart
Shutting down interface eth0:  Device state: 3 (disconnected)
                                                           [  OK  ]
Shutting down loopback interface:                          [  OK  ]
Bringing up loopback interface:                            [  OK  ]
Bringing up interface eth0:  Active connection state: activated
Active connection path: /org/freedesktop/NetworkManager/ActiveConnection/1
                                                           [  OK  ]
[root@PTUDServer3 ~]# ping 8.8.8.8
PING 8.8.8.8 (8.8.8.8) 56(84) bytes of data.
64 bytes from 8.8.8.8: icmp_seq=1 ttl=46 time=65.6 ms


Wednesday, October 21, 2015

Creating a Repository Using Oracle Administration Tool


Download the software

Download Oracle Database 12c Client for Windows

Step 1: Access link to download the software
Step 2: Click winx64_12c_client.zip for Windows 64 bit or winnt_12c_client32.zip for Windows 32 bit.

Step 3: login with Oracle account. After you download you have a zip file:


Download BI Client Installer for Windows

Step 1: Login OBIEE
Step 2: Get Started àDownload BI Desktop Tools àOracle Bi Client Installer (64 bit)


Step 3: After download, you have an .exe file


Installation the software

Installation Oracle Database 12c Client

Step 1: Extract file winx64_12c_client.zip. “client” folder is created.

Step 2: Run setup.exe


Step 3: Choose Administrator (1.4G), click Next.

Step 4: Choose Skip software updates, click Next.

Step 5: On Select Product Languages, click Next


Step 6: On Specify Oracle Home User, Choose Use Windows Built-in Account, Click Next.


Step 7: Specify Installation Location, you choose directory for Oracle base and software location. Click Next

Step 8: Perform Prerequisite Checks, it run automatically


Step 9: on Summary, Click Install

Installation BI Client for Windows

Step 1: Run biee_client_install_x64.exe

Step 2: Select English and click OK.


Step 3: Click Next


Step 4: Click Choose and specified directory which you want to locate the software. Click Next

Step 5: I choose In the Start Menu, and tick Create Icons for All Users. Click Next.
Step 6: Click Install.

Configure Net Manager

Step 1:Start à All Programs à Oracle- OraClient12Homeà Configuration and Migration Tools à Net Manager

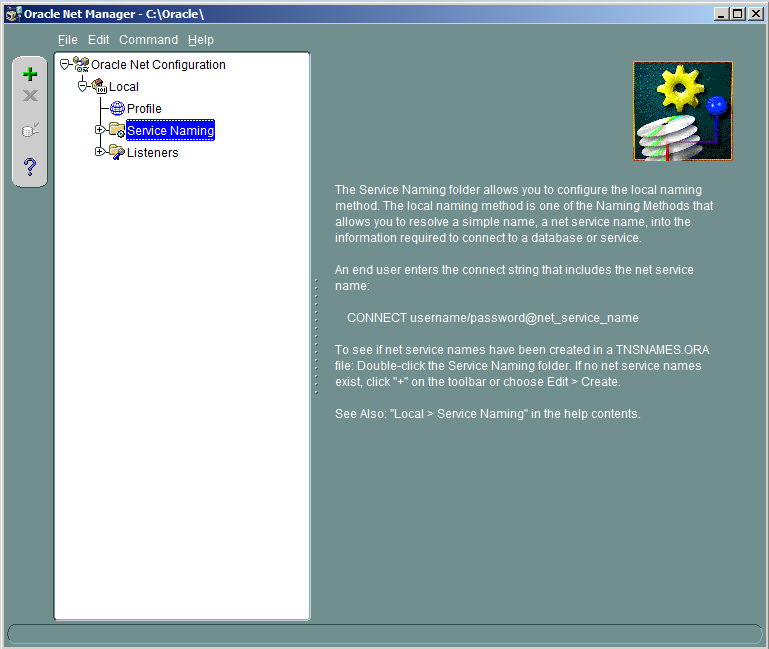
Step 2: Oracle Net Manager appear. Click + icon

Step 3: Enter Net Service Name, and click Next.


Step 4: Choose TCP/IP(Internet Protocol). Click Next
Step 5: On Hostname field, enter IP database server which you want to connect. Click Next

Step 6: On Service Name, enter service name of database which you want to connect. Click Next.

Step 7: You can click Test for make a test connection or click Finish.

Step 8: File -> Save Network Configuration.


Step 9: Remember the configuration will save tnsnames.ora


Configure ODBC for BI Server

Step 1: Start à Control Panel à Administrative Tools à Data Sources (ODBC)
Step 2: On ODBC Data Source Administrator, click System DSN tab. Click Add.

Step 3: Select Oracle BI Server 1. Click Finish.

Step 4: On Name field, enter any name what you want. On Server, enter IP server BI you installed. Click Next

Step 5: Login ID: account you login to BI server, Port: 9703 for default. Tick Save Login ID and Connect. Click Next

Step 6: Click Finish

Configure Environment for TNS

Step 1: My Computer à Properties

Step 2: Click Advanced system settings

Step 3: Click Environment Variables


Step 4:On System variables click New. Variable name: TNS_ADMIN, Variable value:(Example)
E:\Oracle_client\product\12.1.0\client_1\network\admin

Creating Repository


Step 1: Start à Oracle Business Intelligent Enterprise Edition à Administration


Step 2: Click New Repository
Step 3: Name: enter any name which you want, enter password and click Next.
Step 4: Connection Type: OCI 10g/11g, Data Source Name: P6

Step 5:

Step 6:Select Tables which you want to import.

Step 7: Click Finish


Tuesday, October 20, 2015

Introduction to Oracle Enterprise Manager Database Express

What is EM Express?

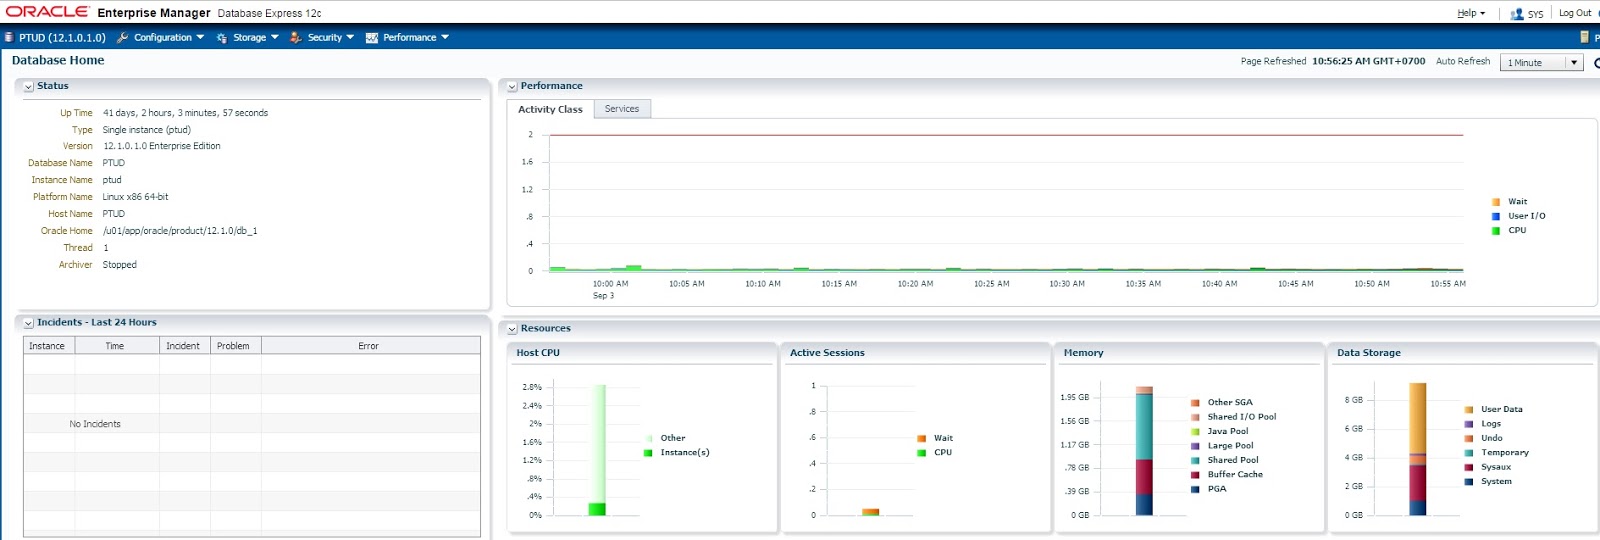
Oracle Enterprise Manager Database Express (EM Express) is a web-based database management tool that is built inside the Oracle Database.
https://Hostname:Port/em


EM Express features?

These Enterprise Manager Database Express features described below can be used
against non-CDBs, CDBs, PDBs, or Oracle RAC database instances.
Configuration:
• Initialization parameters (init.ora) management
• Memory management
• Database Feature Usage
• Database Properties
Security:
• Users management
• Roles management
• Profiles management
Storage:
• Tablespace management
• Undo management
• Redo management1
• Archive log management1
• Control files management1
Performance:
• Performance Hub, which includes these features:
• Real-time performance monitoring and tuning
• Historical performance and tuning
• SQL monitoring (real-time and historical)
• Database operations monitoring
• ADDM, including Real-Time ADDM
• Active Session History (ASH) Analytics
• Automatic and manual SQL Tuning Advisor

Starting EM Express

Starting EM Express for Non-CDB:


Get HTTPS port for EM Express.
SQL> select dbms_xdb_config.gethttpsport() from dual;
Set Https Port for EM Express.
SQL> exec DBMS_XDB_CONFIG.SETHTTPSPORT(5500);


 Starting EM Express for a CDB:

Get Https Port for EM Express
SQL> alter session set container=CDB$ROOT;
SQL> select dbms_xdb_config.gethttpsport() from dual;
Set Https Port for EM Express 
SQL> alter session set container=CDB$ROOT;
SQL> exec DBMS_XDB_CONFIG.SETHTTPSPORT(5501);

Starting EM Express for a PDB

Get Https Port for EM Express
SQL> alter session set container=PDB1;
SQL> select dbms_xdb_config.gethttpsport() from dual;
Set Https Port for EM Express
SQL> alter session set container=PDB1;
SQL> exec DBMS_XDB_CONFIG.SETHTTPSPORT(5502);

Granting Access to EM Express for Nonadministrative Users

[oracle@PTUDServer3 ~]$ sqlplus / as sysdba
SQL*Plus: Release 12.1.0.1.0 Production on Thu Sep 3 17:13:35 2015
Copyright (c) 1982, 2013, Oracle.  All rights reserved.
Connected to:
Oracle Database 12c Enterprise Edition Release 12.1.0.1.0 - 64bit Production
With the Partitioning, OLAP, Advanced Analytics and Real Application Testing options
SQL> create user thonh15 identified by thonh15;
User created.
SQL> grant  EM_EXPRESS_BASIC to thonh15;
Grant succeeded.
SQL> commit;
Commit complete.
SQL> create user tuongnx identified by tuongnx;
User created.
SQL> grant EM_EXPRESS_ALL to tuongnx;
Grant succeeded.
SQL> commit;
Commit complete.
SQL> exit
Disconnected from Oracle Database 12c Enterprise Edition Release 12.1.0.1.0 - 64bit Production
With the Partitioning, OLAP, Advanced Analytics and Real Application Testing options

Getting Started with Oracle Enterprise Manager Express

Thursday, October 1, 2015

Reset the AdminServer password in WebLogic Server


Step 1: Setup environment variables.
[omss@ptud security]$ export MW_HOME=/home/omss/middleware
[omss@ptud security]$ export DOMAIN_HOME=/home/omss/middleware/user_projects/domains/oud_domain

Step 2: Shutdown the WebLogic domain
$DOMAIN_HOME/bin/stopWebLogic.sh

Step 3: Rename the data folder.
[omss@ptud security]$ mv $DOMAIN_HOME/servers/AdminServer/data/ $DOMAIN_HOME/servers/AdminServer/data-old

Step 4: Set environment
[omss@ptud security]$ .  $DOMAIN_HOME/bin/setDomainEnv.sh

Step 5: Reset the password
[omss@ptud oud_domain]$ cd $DOMAIN_HOME/security
 [omss@ptud security]$ java weblogic.security.utils.AdminAccount weblogic 12345678 .

Step 6: Update file boot.properties
[omss@ptud security]$ cd $DOMAIN_HOME/servers/AdminServer/security/
[omss@ptud security]$ vi boot.properties
#Thu Oct 01 10:56:21 ICT 2015
username=weblogic
password=12345678

Step 7: Start the WebLogic domain
$DOMAIN_HOME/bin/startWebLogic.sh