Showing posts with label WCCC. Show all posts

Thursday, September 17, 2015

Create users in WCCC for integrating with P6 EPPM

Step 1: Login Web Console in WCCC server


Step 2: Domain Structure --> Security Realms


Step 3: Select myrealm


Step 4: Settings for myrealm --> Users and Groups --> Groups. Click New


Step 5: Create a New Group. enter Name P6_Role Click OK


Step 6: Settings for myrealm --> Users and Groups -->Users. Click New


Step 7: Click OK


Step 8: Select user thonh15 ( example user)


Step 9: Groups Tab, move P6_Role from left Available session to Chosen. Click Save


Connecting the Content Repository to P6 R15.1

About Connecting the Content Repository:

Oracle Document:

http://docs.oracle.com/cd/E61144_01/English/Install_and_Config/Admin_PDF_Library/connecting_the_content_repository_to_p6.pdf


Architecture:


On this model, Documents functionality is a important Core Enterprise Functionality. Having a content repository integrated with P6 can turn cluttered, unstructured content into organized assets by making it easier to catalog, access, search, and reuse documentation.
This guide will tell you how to:
  • Configure Oracle Webcenter Content Core Capabilities (WCCC) when you install it. 
  • Set your content repository settings in the Primavera P6 Administrator to connect your content repository to P6. 

About Content Repository Authentication Modes:

P6 EPPM offers two content repository authentication modes. You can configure authentication
for either single user authentication or multiple user authentication. In single user authentication
mode, all P6 EPPM users access the repository using a single administrator user login that is set
during repository configuration. In multiple user authentication mode, each P6 EPPM user is
authenticated based on their individual login.

Single User authentication mode is useful when you want users to have full access to the content
repository through P6 EPPM without having to maintain an equivalent list of users for both P6
EPPM and the repository. This allows a repository administrator to maintain one set of credentials
for the repository without having to share those credentials with all users. Single user
authentication is also useful for quickly setting up test repositories that testers can access with
ease.

Multiple User authentication mode is the default mode. Multiple user authentication mode
provides increased security by restricting content repository access on an individual user basis.
Because it uses native auditing fields it also allows a clear audit of who has created and modified
files.
On this guide, I choose Multiple User authentication mode.

Configuring the Content Repository for P6:

Configuring WCCC to work with P6

1.(required) Establish a Trusted Connection to the P6 EPPM database by adding the P6 EPPM machine name or IP address as a trusted server in the WCCC server's configuration file.
[wccc@PTUD-VM01-2 ~]$ cd fmw/user_projects/domains/wccc_domain/ucm/cs/config/
[wccc@PTUD-VM01-2 config]$ vi config.cfg

#Server System Properties
IDC_Name=PTUDVM0128000
IdcProductName=idccs
InstanceMenuLabel=PTUDVM0128000
InstanceDescription=Instance PTUDVM0128000
SocketHostAddressSecurityFilter=127.0.0.1|0:0:0:0:0:0:0:1|192.168.2.156|192.168.2.133

#Database Variables
SystemDatabase:DataSource=CSDS
SystemDatabase:UseDataSource=true

#Internet Variables
HttpServerAddress=192.168.2.133:8000
MailServer=mail
SysAdminAddress=sysadmin@example.com
HttpRelativeWebRoot=/cs/
UseSSL=No

#General Option Variables
IsAutoNumber=Yes
AutoNumberPrefix=PTUDVM0128000

#Additional Variables
SearchIndexerEngineName=OracleTextSearch
IntradocServerPort=4444
WebServer=javaAppServer
FileEncoding=UTF8
Note:
192.168.2.133: IP of P6 EPPM database server
192.168.2.156: IP of WCCC server.
Reboot the WCCC server. 
2. Enable Framework folders. The Framework folder interface is not enabled by default. To enable it, see http://vtgdb.blogspot.com/2015/09/enable-framework-folders-for-wccc.html
3. (required) Create a P6 EPPM Security Group in WCCC and grant the appropriate rights( read, write, delete) for P6 EPPM users.
Details see 
4.(required) Create an P6 EPPM documents home folder on the WCCC server by adding unique path to the root folder.
Details see
5. Create users in WCCC for integrating with P6 EPPM
http://vtgdb.blogspot.com/2015/09/create-users-in-wccc-for-integrating.html
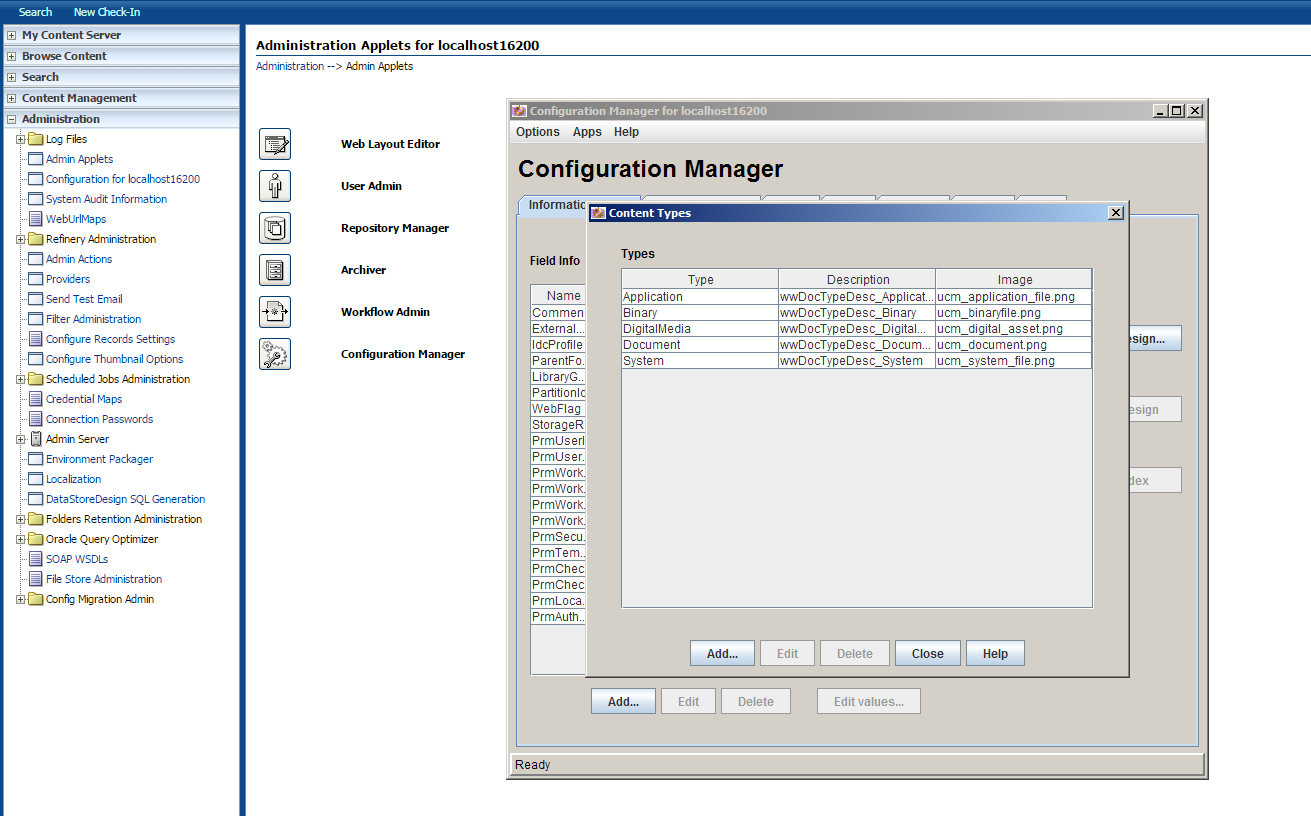
6. Create a Document Type for P6 EPPM documents in WCCC.

You can skip this step because you use Document Type name "Document" in WCCC for P6.

7. (required) Configuration Manager applet:
detail see http://vtgdb.blogspot.com/2015/09/create-metadata-text-fields-in-wccc-for.html
8. (required) Configure the appropriate settings for the Primavera P6 Administrator.
see blog http://vtgdb.blogspot.com/2015/09/configuring-wccc-in-p6-eppm-r151.html
9. Restart the WCCC server.
Configuring the Oracle Database Content Repository

Configuring WCCC in the P6 EPPM R15.1 Database Settings

Step 1: Login Primavera P6 Administrator with administrator user


Step 2: Configurations -->Custom --> Primavera P6 Configuration -->Database-->Instance[1] -->Content Repository -->Oracle Webcenter Content Core Capabilities

  • Host: 192.168.2.156
  • Port:4444
  • Oracle Home: /P6_Folder
  • Oracle Security Group: P6_Group
  • Oracle Document Type: Document
  • Metadata Prefix: Prm
  • Admin User: sysadmin
  • Authentication Mode: Multiple User


Step 3: Click Save Changes

Step 4: Reboot P6 
 You can see blog


Create metadata text fields in WCCC for P6 EPPM

Overview:

a. Create the following metadata text fields in the "Information fields" tab, exactly as
specified (including case), in WCCC for P6 EPPM:
 PrmUserId
 PrmProjectId
 PrmWorkgroupId
 PrmWorkflowId
 PrmWorkflowStatus
 PrmWorkflowAction
 PrmSecurityPolicy
 PrmTemplate
 PrmCheckedOutUserId
 PrmCheckedOutDate
 PrmLocalFilePath (make Type = Long Text)
 PrmAuthorId
Using "Prm" as a prefix is optional. You can use any prefix. If you don't use a prefix, ensure
that none of the P6 EPPM metadata fields conflict with existing metadata fields.
b. Select the "Update Database Design" button to commit the changes.

Step By Step:


Step 1: Login WCCC


Click Login, enter Username and Password

Step 2: Administration --> Admin Applets-->Configuration Manager 
Step 3: Click Add, Content Types dialog appear.
Step 4: click Add, Add Metadata Field Name appear. On Field Name enter PrmUserId
Step 5: On Add Metada Field 'PrmUserId' enter value like it.

Step 6: loop order Step 4 and Step 5 for 
PrmProjectId, 
PrmWorkgroupId, 
PrmWorkflowId, 
PrmWorkflowStatus, 
PrmWorkflowAction, 
PrmSecurityPolicy, 
PrmTemplate,
PrmCheckedOutUserId,
PrmCheckedOutDate
Step 7: Add Metadata Field 'PrmLocalFilePath'

Step 8:Note: On Field Type choose Long Text
Step 9: Loop Step 4 and Step 5 for 'PrmAuthorId'

Step 10: click Update Database Design


Step 11: Click Ok


Wednesday, September 16, 2015

Create an P6 EPPM documents home folder on the WCCC server

Prerequisite:

Ensure do this step firstly
http://vtgdb.blogspot.com/2015/09/enable-framework-folders-for-wccc.html

Step to do:

Step 1: Login WCCC server


Enter username, password to login.

Step 2Browse Content -->Folders   


Step 3: On Top Right, you select Add --> New Folder


Step 4: Click show advanced options
Step 5: On Folder Name: P6_Folder, Owner: weblogic, Security Group: P6_Group. Click Create


Step 6: Finish


Create an P6 EPPM Security Group,Role in WCCC

Step 1: Login to WCCC
 Click Login, enter username and password
Step 2: Click Admin Applets on Administration 


Step 3: Click User Admin


Step 3: Click Permissions by Group


Step 4: Click Add Group, Group Name is P6_Group, Description: P6 EPPM Security Group. Click OK.


Step 5: P6_Group created. Click Close


Step 6: User Admin -> Security -> Permissions by Role


Step 7: click Add New Role, on Role Name enter P6_Role, on Role Display Name: P6 EPPM Security Role. Click OK.


Step 8: P6_Role created,  on Groups/Rights choose P6_Group() click Edit Permissions ...


Step 9: Click OK.


Step 10: Click Close