Thursday, March 3, 2016

How to select columns with null values


Connect with your  schema and run the sql scripts

SET LINESIZE 32000;
SET PAGESIZE 40000;
SET LONG 50000;
SELECT t.table_name,
t.column_name
FROM user_tab_columns t
WHERE t.nullable = 'Y'
AND t.num_distinct = 0 AND t.table_name='TABLE_NAME';

For example:

SET LINESIZE 32000;
SET PAGESIZE 40000;
SET LONG 50000;
SELECT t.table_name,
t.column_name
FROM user_tab_columns t
WHERE t.nullable = 'Y'
AND t.num_distinct = 0 AND t.table_name='SUBS';


Result:

TABLE_NAME                     COLUMN_NAME                
------------------------------ ------------------------------
SUBS                           FINISH_REASON_ID            
SUBS                           CONTRACT_VALID              
SUBS                           PROMOTION_VALID            
SUBS                           NOTES                      
SUBS                           FIRST_SHOP_CODE            
SUBS                           FIRST_EXP_DATE              
SUBS                           SECOND_EXP_DATE            
SUBS                           PROM_VALID_DATETIME        
SUBS                           LAST_USERNAME              
SUBS                           PASSWORD                    
SUBS                           SECRET                      
SUBS                           EXPIRE_DATE                
SUBS                           NATIONALITY                
SUBS                           SELLING_PRICE              
SUBS                           CENTER_CODE                
SUBS                           ZONE_ID                    
SUBS                           ZONE_ADDRESS                
SUBS                           ZONE_AREA_CODE              
SUBS                           PRODUCT_ID                  
SUBS                           NUM_REFILLS                
SUBS                           UPDATE_STATUS              
SUBS                           CUST_TYPE                  
SUBS                           CONTACT_NAME                
SUBS                           ZONE_CODE                  
SUBS                           NUM_CHANGE_METZONE          
SUBS                           LAST_CHANGE_METZONE        
SUBS                           AREA_CODE_ACTIVE            
SUBS                           CELL_ID_ACTIVE              
SUBS                           OLD_EMP_CODE                
SUBS                           EMP_CODE_BK                
SUBS                           FLAG                        
SUBS                           SERIAL_MACHINE              
SUBS                           COUNT_UPDATE_INFOR          
SUBS                           UPDATE_DATE                
SUBS                           G_TYPE                      
SUBS                           TYPE_MACHINE                
SUBS                           NUM_3G                      
SUBS                           SOURCE_TYPE                
SUBS                           ID_ADDRESS                  
SUBS                           FAX                        
SUBS                           DATA                        
SUBS                           ID_NO                      
SUBS                           ID_ISSUE_PLACE              
SUBS                           CONTRACT_NO                
SUBS                           CONTRACT_TYPE              
SUBS                           CONTRACT_DATE              
SUBS                           REG_REASON_ID              
SUBS                           PROM_PROGRAM_CODE1          
SUBS                           PROM_PROGRAM_CODE2          

 49 rows selected 

How to connect PENTAHO with Oracle Database (12c/11g)


Step 1: Set JAVA environment for PENTAHO


My Computer --> Properties( Click right mouse My Computer) --> Advanced system settings --> Environment Variables --> User Variables --> New

PENTAHO_JAVA=C:\Program Files\Java\jdk1.7.0_79\jre\bin\java.exe
PENTAHO_JAVA_HOME=C:\Program Files\Java\jdk1.7.0_79\jre

Step 2: Download OJDBC 11g and 12c for Oracle Database 11g/12c

Example:
12c:
I download JDBC Driver for Oracle Database 12.1.0.2 from  http://www.oracle.com/technetwork/database/features/jdbc/default-2280470.html
I choose          ojdbc7.jar (3,698,857 bytes) - (SHA1 Checksum: 7c9b5984b2c1e32e7c8cf3331df77f31e89e24c2)
Certified with JDK7 and JDK 8; It contains the JDBC driver classes except classes for NLS support in Oracle Object and Collection types.

11g:
I download JDBC Driver for Oracle Database 11.2.0.4 from http://www.oracle.com/technetwork/database/enterprise-edition/jdbc-112010-090769.html
I choose          ojdbc6.jar (2,739,670 bytes) - (SHA1 Checksum: a483a046eee2f404d864a6ff5b09dc0e1be3fe6c)
Certified with JDK 8, JDK 7 and JDK 6: It contains the JDBC driver classes except classes for NLS support in Oracle Object and Collection types.

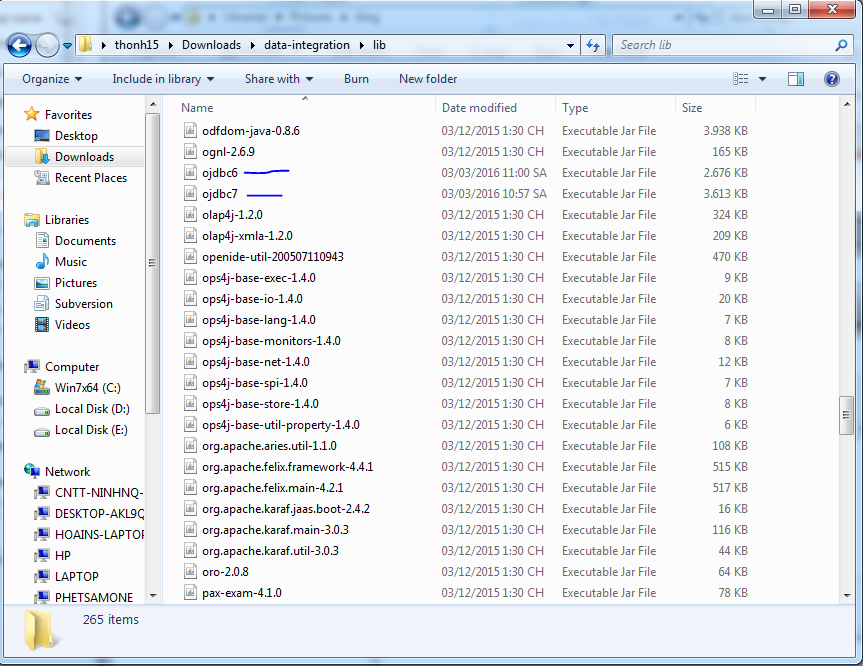
Step 3: Copy ojdbc6.jar and ojdbc7.jar to directory PENTAHO_HOME/data-integration/lib


Step 4: Check your connection


Good luck!

Wednesday, March 2, 2016

How to install php 5.5.1.0 on linux


Step 1: Download the software


Step 2: Untar the downloaded file


[root@VTGDB.COM ~]# tar -xvf oel-dependency-install.tar.gz
oel-dependency-install/
oel-dependency-install/dependency-install.sh
oel-dependency-install/._libjpeg-turbo-1.2.1-3.el6_5.x86_64.rpm
oel-dependency-install/libjpeg-turbo-1.2.1-3.el6_5.x86_64.rpm
oel-dependency-install/._openssl-1.0.1e-16.el6_5.x86_64.rpm
oel-dependency-install/openssl-1.0.1e-16.el6_5.x86_64.rpm
oel-dependency-install/oracle-instantclient12.1-basic-12.1.0.1.0-1.x86_64.rpm
oel-dependency-install/oracle-instantclient12.1-sqlplus-12.1.0.1.0-1.x86_64.rpm
oel-dependency-install/php55-5.5.10-1.el6.x86_64.rpm
oel-dependency-install/php55-bcmath-5.5.10-1.el6.x86_64.rpm
oel-dependency-install/php55-cli-5.5.10-1.el6.x86_64.rpm
oel-dependency-install/php55-common-5.5.10-1.el6.x86_64.rpm
oel-dependency-install/php55-dba-5.5.10-1.el6.x86_64.rpm
oel-dependency-install/php55-fpm-5.5.10-1.el6.x86_64.rpm
oel-dependency-install/php55-gd-5.5.10-1.el6.x86_64.rpm
oel-dependency-install/php55-intl-5.5.10-1.el6.x86_64.rpm
oel-dependency-install/php55-ldap-5.5.10-1.el6.x86_64.rpm
oel-dependency-install/php55-mbstring-5.5.10-1.el6.x86_64.rpm
oel-dependency-install/php55-mysql-5.5.10-1.el6.x86_64.rpm
oel-dependency-install/php55-oci8-12cR1-5.5.10-2.el6.x86_64.rpm
oel-dependency-install/php55-opcache-5.5.10-1.el6.x86_64.rpm
oel-dependency-install/php55-pdo-5.5.10-1.el6.x86_64.rpm
oel-dependency-install/php55-xml-5.5.10-1.el6.x86_64.rpm

Step 3: Install the software


[root@VTGDB.COM ~]# cd oel-dependency-install
[root@VTGDB.COM oel-dependency-install]# ls
dependency-install.sh                                   oracle-instantclient12.1-sqlplus-12.1.0.1.0-1.x86_64.rpm  php55-common-5.5.10-1.el6.x86_64.rpm  php55-intl-5.5.10-1.el6.x86_64.rpm      php55-oci8-12cR1-5.5.10-2.el6.x86_64.rpm
libjpeg-turbo-1.2.1-3.el6_5.x86_64.rpm                  php55-5.5.10-1.el6.x86_64.rpm                             php55-dba-5.5.10-1.el6.x86_64.rpm     php55-ldap-5.5.10-1.el6.x86_64.rpm      php55-opcache-5.5.10-1.el6.x86_64.rpm
openssl-1.0.1e-16.el6_5.x86_64.rpm                      php55-bcmath-5.5.10-1.el6.x86_64.rpm                      php55-fpm-5.5.10-1.el6.x86_64.rpm     php55-mbstring-5.5.10-1.el6.x86_64.rpm  php55-pdo-5.5.10-1.el6.x86_64.rpm
oracle-instantclient12.1-basic-12.1.0.1.0-1.x86_64.rpm  php55-cli-5.5.10-1.el6.x86_64.rpm                         php55-gd-5.5.10-1.el6.x86_64.rpm      php55-mysql-5.5.10-1.el6.x86_64.rpm     php55-xml-5.5.10-1.el6.x86_64.rpm
[root@VTGDB.COM oel-dependency-install]# ./dependency-install.sh
Installing OMSS OEL dependencies...
Removing old versions of oracle-instantclient
rpm: no packages given for erase
Removing old versions of php...
rpm: no packages given for erase
Installing openssl-1.0.1e-16.el6_5.x86_64.rpm...
warning: openssl-1.0.1e-16.el6_5.x86_64.rpm: Header V3 RSA/SHA256 Signature, key ID ec551f03: NOKEY
Preparing...                ########################################### [100%]
            package openssl-1.0.1e-30.el6.x86_64 (which is newer than openssl-1.0.1e-16.el6_5.x86_64) is already installed
Installing libjpeg-turbo-1.2.1-3.el6_5.x86_64.rpm...
warning: libjpeg-turbo-1.2.1-3.el6_5.x86_64.rpm: Header V3 RSA/SHA256 Signature, key ID ec551f03: NOKEY
Preparing...                ########################################### [100%]
            package libjpeg-turbo-1.2.1-3.el6_5.x86_64 is already installed
Installing oracle-instantclient12.1-basic-12.1.0.1.0-1.x86_64.rpm..
Preparing...                ########################################### [100%]
   1:oracle-instantclient12.########################################### [100%]
Installing oracle-instantclient12.1-sqlplus-12.1.0.1.0-1.x86_64.rpm...
Preparing...                ########################################### [100%]
   1:oracle-instantclient12.########################################### [100%]
Reloading ldconfig...
Intalling php55-common-5.5.10-1.el6.x86_64.rpm...
Preparing...                ########################################### [100%]
   1:php55-common           ########################################### [100%]
Intalling php55-cli-5.5.10-1.el6.x86_64.rpm...
Preparing...                ########################################### [100%]
   1:php55-cli              ########################################### [100%]
Intalling php55-5.5.10-1.el6.x86_64.rpm...
Preparing...                ########################################### [100%]
   1:php55                  ########################################### [100%]
Intalling php55-bcmath-5.5.10-1.el6.x86_64.rpm...
Preparing...                ########################################### [100%]
   1:php55-bcmath           ########################################### [100%]
Intalling php55-dba-5.5.10-1.el6.x86_64.rpm...
Preparing...                ########################################### [100%]
   1:php55-dba              ########################################### [100%]
Intalling php55-fpm-5.5.10-1.el6.x86_64.rpm...
Preparing...                ########################################### [100%]
   1:php55-fpm              ########################################### [100%]
Intalling php55-gd-5.5.10-1.el6.x86_64.rpm...
Preparing...                ########################################### [100%]
   1:php55-gd               ########################################### [100%]
Intalling php55-intl-5.5.10-1.el6.x86_64.rpm...
Preparing...                ########################################### [100%]
   1:php55-intl             ########################################### [100%]
Intalling php55-ldap-5.5.10-1.el6.x86_64.rpm...
Preparing...                ########################################### [100%]
   1:php55-ldap             ########################################### [100%]
Intalling php55-mbstring-5.5.10-1.el6.x86_64.rpm...
Preparing...                ########################################### [100%]
   1:php55-mbstring         ########################################### [100%]
Intalling php55-pdo-5.5.10-1.el6.x86_64.rpm...
Preparing...                ########################################### [100%]
   1:php55-pdo              ########################################### [100%]
Intalling php55-mysql-5.5.10-1.el6.x86_64.rpm...
Preparing...                ########################################### [100%]
   1:php55-mysql            ########################################### [100%]
Intalling php55-oci8-12cR1-5.5.10-2.el6.x86_64.rpm...
Preparing...                ########################################### [100%]
   1:php55-oci8-12cR1       ########################################### [100%]
Intalling php55-opcache-5.5.10-1.el6.x86_64.rpm...
Preparing...                ########################################### [100%]
   1:php55-opcache          ########################################### [100%]
Intalling php55-xml-5.5.10-1.el6.x86_64.rpm...
Preparing...                ########################################### [100%]
   1:php55-xml              ########################################### [100%]
  

Step 4: Check new installed php


[root@VTGDB.COM oel-dependency-install]# rpm -qa | grep php
php55-opcache-5.5.10-1.el6.x86_64
php55-common-5.5.10-1.el6.x86_64
php55-intl-5.5.10-1.el6.x86_64
php55-pdo-5.5.10-1.el6.x86_64
php55-cli-5.5.10-1.el6.x86_64
php55-mbstring-5.5.10-1.el6.x86_64
php55-dba-5.5.10-1.el6.x86_64
php55-oci8-12cR1-5.5.10-2.el6.x86_64
php55-bcmath-5.5.10-1.el6.x86_64
php55-mysql-5.5.10-1.el6.x86_64
php55-gd-5.5.10-1.el6.x86_64
php55-xml-5.5.10-1.el6.x86_64
php55-fpm-5.5.10-1.el6.x86_64
php55-ldap-5.5.10-1.el6.x86_64
php55-5.5.10-1.el6.x86_64
[root@VTGDB.COM oel-dependency-install]# ls
dependency-install.sh                                   oracle-instantclient12.1-sqlplus-12.1.0.1.0-1.x86_64.rpm  php55-common-5.5.10-1.el6.x86_64.rpm  php55-intl-5.5.10-1.el6.x86_64.rpm      php55-oci8-12cR1-5.5.10-2.el6.x86_64.rpm
libjpeg-turbo-1.2.1-3.el6_5.x86_64.rpm                  php55-5.5.10-1.el6.x86_64.rpm                             php55-dba-5.5.10-1.el6.x86_64.rpm     php55-ldap-5.5.10-1.el6.x86_64.rpm      php55-opcache-5.5.10-1.el6.x86_64.rpm
openssl-1.0.1e-16.el6_5.x86_64.rpm                      php55-bcmath-5.5.10-1.el6.x86_64.rpm                      php55-fpm-5.5.10-1.el6.x86_64.rpm     php55-mbstring-5.5.10-1.el6.x86_64.rpm  php55-pdo-5.5.10-1.el6.x86_64.rpm
oracle-instantclient12.1-basic-12.1.0.1.0-1.x86_64.rpm  php55-cli-5.5.10-1.el6.x86_64.rpm                         php55-gd-5.5.10-1.el6.x86_64.rpm      php55-mysql-5.5.10-1.el6.x86_64.rpm     php55-xml-5.5.10-1.el6.x86_64.rpm

[root@VTGDB.COM oel-dependency-install]#

Tuesday, March 1, 2016

Setting up an Active Standby Timesten


Active
Standby
Server: 192.168.2.149(vtgptudserver)
Data Store: master1
Installing Directory:/u01/app/TimesTen/tt1121
Port's Daemon: 53396
Port TCP/IP Server TimesTen listen on: 53397

Server: 192.168.2.133 ( PTUDServer3)
Data Store: master2
Installing Directory:/u01/app/TimesTen/tt1122/
Daemon port: 53388
Port TCP/IP Server TimesTen listen on: 53389

1.   Create an Active Master Database
a. Log in to server 1 (vtgptudserver) as the instance administrator and define a DSN for the active master database. In this example we will use a pre-defined DSN master1

Refer to the section Setting up Data Source Name if you need information on how to define your own DSNs.
b. Create and connect to the database master1 using ttIsql:
ttIsql master1
Active (vtgptudserver)
[orattadmin@vtgptudserver info]$ ttisql master1


Copyright (c) 1996-2011, Oracle.  All rights reserved.
Type ? or "help" for help, type "exit" to quit ttIsql.

connect "DSN=master1";
Connection successful: DSN=master1;UID=orattadmin;DataStore=/u01/app/TimesTen/tt1122/info/master1;DatabaseCharacterSet=AL32UTF8;ConnectionCharacterSet=US7ASCII;DRIVER=/u01/app/TimesTen/tt1122/lib/libtten.so;PermSize=40;TempSize=32;TypeMode=0;
(Default setting AutoCommit=1)
Command>


If necessary, refer to the section Creating a TimesTen Database for more information.

2.   Create a Database User to Administer the Replication Operations


a. Create a database user and assign it the role of the database and replication administrator. This user is responsible for setting up and managing the active standby pair.

In ttIsql, create an administrator and grant this user admin privilege. In the example, the user adm is the administrator

create user adm identified by adm;
grant admin to adm;
Active (vtgptudserver)
Command> CREATE USER adm IDENTIFIED BY adm;


User created.


Command> GRANT ADMIN TO adm;
b.  Create an application user and tables in the database. In our example, we will create an application user called appuser and this user will own the customers and orders tables.
Create user appuser identified by appuser;
grant create session, create table to appuser;
Active (vtgptudserver)
Command> CREATE USER appuser IDENTIFIED BY appuser;


User created.


Command> GRANT CREATE SESSION, CREATE TABLE TO appuser;

c.   Log in as the user appuser in ttIsql. Execute the following SQL statements, or run the script create_app_user_obj.sql located in the quickstart/sample_scripts/replication/create_appuser_obj.sql”
Active (vtgptudserver)
connect "dsn=master1;uid=appuser";
run "quickstart/sample_scripts/replication/create_appuser_obj.sql"      
create table customers (
cust_number number,
first_name varchar2(12) not null,
last_name varchar2(12) not null,
address varchar2(100) not null,
primary key (cust_number));
insert into customers values (3700,'Peter','Burchard','882 Osborne Avenue, Boston, MA 02122');
insert into customers values (1121,'Saul','Mendoza','721 Stardust Street, Mountain View, CA 94043');
create table orders (
order_number number not null,
cust_number number not null,
prod_number char(10) not null,
order_date date not null,
primary key (order_number),
foreign key (cust_number) references customers (cust_number));
insert into ORDERS values (6853036,3700,'0028616731',to_date('2008-04-05','yyyy-mm-dd'));
insert into ORDERS values (6853041,3700,'0198612710',to_date('2009-01-12','yyyy-mm-dd'));
insert into ORDERS values (6853169,1121,'0003750299',to_date('2008-08-01','yyyy-mm-dd'));
insert into ORDERS values (6853174,1121,'0789428741',to_date('2008-10-25','yyyy-mm-dd'));
insert into ORDERS values (6853179,1121,'0198612583',to_date('2009-02-02','yyyy-mm-dd'));

d. Use the tables command in ttIsql to confirm that the tables has been created.
Active (vtgptudserver)
Command> tables;
  APPUSER.CUSTOMERS
  APPUSER.ORDERS
2 tables found.
Command>
After setting up an initial database, you can now define the configuration of the active standby pair and assign to the current database the active state.
3.   Define the active standby pair
a. In ttIsql, connect to master1 as the replication administrator adm
connect “dsn=master1;uid=adm”;
Active (vtgptudserver)
Command> connect "dsn=master1;uid=adm";
Enter password for 'adm':
Connection successful: DSN=master1;UID=adm;DataStore=/u01/app/TimesTen/tt1122/info/master1;DatabaseCharacterSet=AL32UTF8;ConnectionCharacterSet=US7ASCII;DRIVER=/u01/app/TimesTen/tt1122/lib/libtten.so;PermSize=40;TempSize=32;TypeMode=0;
(Default setting AutoCommit=1)
Command>

b. Define an active standby pair schema by using CREATE ACTIVE STANDBY PAIR statement. The default replication mode for an active standby pair is asynchronous.
 CREATE ACTIVE STANDBY PAIR master1 ON "vtgptudserver", master2 ON "PTUDServer3"
Command> CREATE ACTIVE STANDBY PAIR master1 ON "ptudvtg149", master2 ON "PTUDServer3";


Note: The data store names master1 and master2 used in the CREATE ACTIVE STANDBY statement are not DSNs. They are the filenames defined in the DataStore attribute. The hostnames used in defining the active standby pair should match the values returned by the OS hostname command on the respective servers.

c. The ttIsql command repschemes can be used to verify the current replication scheme deployed in the database.
 repschemes;

Active (vtgptudserver)
Command> repschemes;


Replication Scheme Active Standby:


  Master Store: MASTER1 on vtgptudserver
  Master Store: MASTER2 on PTUDSERVER3


  Excluded Tables:
    None


  Excluded Cache Groups:
    None


  Excluded sequences:
    None


  Store: MASTER1 on vtgptudserver
    Port: (auto)
    Log Fail Threshold: (none)
    Retry Timeout: 120 seconds
    Compress Traffic: Disabled


  Store: MASTER2 on PTUDSERVER3
    Port: (auto)
    Log Fail Threshold: (none)
    Retry Timeout: 120 seconds
    Compress Traffic: Disabled


1 replication scheme found.

Command> ALTER ACTIVE STANDBY PAIR
       >   ALTER STORE master1 on "ptudvtg149"SET PORT 53388 TIMEOUT 180
       >   ALTER STORE master2 on "PTUDServer3" SET PORT 53388 TIMEOUT 180;


4.   Start the replication agent

a.
The replication agent is responsible for replicating data between TimesTen databases. It must be running on both databases in an active standby pair. Use the built-in procedure ttRepStart to start the Replication agent.


call ttrepstart;

5.   Set the replication state to Active


Use the built-in procedure ttRepStateSet to designate the current database (repdb1_1121) the active state in the active standby pair. ttRepStateGet returns the current replication state of the database.


call ttrepstateset ('active');
call ttrepstateget;


Active (vtgptudserver)

Command> call ttrepstart;
Command>
Command> call ttrepstateset ('active');
Command> call ttrepstateget;
< ACTIVE, NO GRID >
1 row found.

After setting up an active master database and defining the active standby pair configuration, you can now create the standby database
6.   Duplicate the active database to the standby

a.
Log in to server 2 (PTUDServer3) as the instance administrator. Use the ttRepAdmin utility to duplicate from the active database to the standby database.


ttrepadmin -duplicate -from master1 -host "ptudvtg149" -uid adm -pwd adm "dsn=master2"


Note that the -from clause is using the data store name master1 and not the DSN name; -uid and -pwd correspond to the username and password of the ADMIN user on the active database.
Standby(PTUDServer3)

[orattadmin@PTUDServer3 info]$ ttrepadmin -duplicate  -remoteDaemonPort 53396 -verbosity 2 -from master1 -host "ptudvtg149" -uid adm -pwd adm "dsn=master2"
14:30:15 Contacting remote main daemon at 192.168.2.149 port 53396
14:30:15 Contacting the replication agent for MASTER1 ON PTUDVTG149 (192.168.2.149) port 53388
14:30:15 Beginning transfer from MASTER1 ON PTUDVTG149 to MASTER2 ON PTUDSERVER3
14:30:22 Checkpoint transfer 10 percent complete
14:30:22 Checkpoint transfer 20 percent complete
14:30:22 Checkpoint transfer 100 percent complete
14:30:22 Checkpoint transfer phase complete
14:30:24 Log transfer 100 percent complete
14:30:24 Log transfer phase complete
14:30:24 Transfer complete
14:30:27 Duplicate Operation Ends


7.   Start the replication agent

a.
Using ttIsql, connect to the database master2 as the replication administrator adm.


ttisql "dsn=master2;uid=adm"


b.
The replication agent on the standby is responsible for processing the data from the active database. Use the built-in procedure ttRepStart to start the replication agent.


call ttrepstart;


c.
Wait for master2 to enter the standby state. Use the built-in procedure ttRepStateGet to verify the current replication state of the database.


call ttrepstateget;
Standby(PTUDServer3)

Command> call ttrepstateget;
< STANDBY, NO GRID >
1 row found.


8.   Verify the data is being replicated between the active and the standby

a.
In ttIsql, connect to master1 as appuser, and insert a record into the orders table.


connect "dsn=master1; uid=appuser";
insert into orders values (6853180,1121,'9999999999', sysdate);


Active (vtgptudserver)


b.
Verify that the insert is replicated to the standby database master2.


select * from appuser.orders where order_number=6853180;


Standby(PTUDServer3)


Reference:


Monday, February 29, 2016

Example Creating tablespace in Oracle Database.

Create undo tablespace:

create undo tablespace undotbs2 datafile '/u01/app/oracle/oradata/ORCL/datafile/undotbs2.dbf' size 100M autoextend on next 10M;

Create tablespace:

create tablespace BOC datafile '/u01/app/oracle/oradata/ORCL/datafile/BOC.dbf' size 100M autoextend on next 10M;

Create temporary tablespace:

CREATE TEMPORARY TABLESPACE TEMP1 TEMPFILE '/u01/app/oracle/oradata/ORCL/datafile/temp.dbf' SIZE 2000M;


Wednesday, February 24, 2016

Displaying Backup Information Oracle Database

[oracle@VTGDB-Server app]$ sqlplus / as sysdba

SQL*Plus: Release 12.1.0.1.0 Production on Thu Feb 25 13:56:15 2016

Copyright (c) 1982, 2013, Oracle.  All rights reserved.


Connected to:
Oracle Database 12c Enterprise Edition Release 12.1.0.1.0 - 64bit Production
With the Partitioning, OLAP, Advanced Analytics and Real Application Testing options

SQL> select session_key, input_type, status, start_time, end_time, elapsed_seconds/3600 hrs from v$rman_backup_job_details;

SESSION_KEY INPUT_TYPE  STATUS  START_TIM END_TIME     HRS
----------- ------------- ----------------------- --------- --------- ----------
 2 DB FULL  COMPLETED  25-FEB-16 25-FEB-16 .331388889
 6 DB FULL  FAILED  25-FEB-16 25-FEB-16 .004166667
11 DB FULL  COMPLETED  25-FEB-16 25-FEB-16 .097777778
22 DB FULL  COMPLETED  25-FEB-16 25-FEB-16 .098333333
31 DB FULL  RUNNING  25-FEB-16 25-FEB-16 .040555556